Showing posts with label Holiday. Show all posts

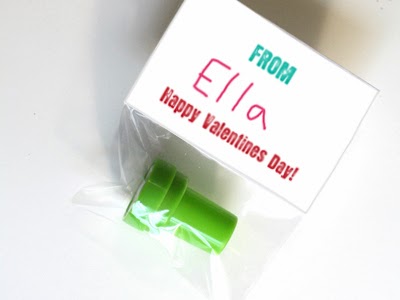
STAMP-endous Valentines!

1.16.2014

 
I have now become the queen of No-Candy Valentines. And I'm fine with that. In fact, I LOVE it!  This year's Valentines are great because they are gender neutral and inexpensive.  I bought my stamps from Oriental Trading Company (when they were offering FREE shipping), but you can shop around online and in teacher stores, party stores or WalMart-type stores to find them as well.  You can get them for around $0.22/each.
You could also totally use inexpensive foam stamps like these.  Just break them apart and put one in each bag!


STAMP-endous printable
small clear treat bages (4.75" x 3")
small inked stamps
Cardstock
paper trimmer OR scissors
stapler

1. Cut 1 inch off top of clear bags (optional)
 
 
2. Print desired number of bag toppers, from the download provided, onto cardstock.
3. Trim toppers with scissor OR paper trimmer.
 
 
4. Have child write their name in marker, crayon, etc. in the space provided.  Fold toppers in half.

5. Place stamp in baggie. Place topper over cut top of clear bag and staple from the top, just beneath the image.


EASY handmade sugar scrub

2.20.2013


My girls and I had a Valentine's party this year for their favorite friends and their Mommies (who also happen to be MY favorite friends). We made favor bags for the little girl guests, but I also wanted to make a favor for the Moms. I whipped up this simple sugar scrub for hands as favors. My kids also mixed up their own batches for their school teachers. I saved one of the favors for me and I am IN LOVE! This made my hands so soft and it couldn't be easier.

 
4 oz. jelly jars with lids (or 4 oz baby food jars with lids)
one bottle liquid handsoap
white granulated sugar
food coloring (optional)
 
to decorate: twine, small tags, sticker paper, download of printable labels



1. In a small bowl pour 1/2 cup sugar.  Of course, you can make this in a much larger batch and then just divide it into the jars.  

2. Add 1 Tbsp. liquid hand soap.  Choose a soap that is the color you want to go along with your theme and which smells really good.  I used Dial Pomegranate and Tangerine.  I measured this once by counting the "pumps" it took to get 1 Tbsp. and then just pumped it without measuring there after.
 

 3. Mix well with a spoon.  It's going to feel too dry, but just keep mixing. You want a very tight scrub. If you add too much liquid soap it will separate while in the jar. Yuck.
 
 
4. If you want a deeper color to go with a party theme you may add a very small amount of gel food coloring. I used Wilton in mine.  I did test it and it in no way colors your skin. If you choose to deepen the color you want to make one large batch so the color matches in each jar.
 
 
5. Spoon by half-cup fulls into your jars.
 
6. Print sheet of labels (either pink or grey...please don't request custom colors...the grey will match with everything!) Cut around each circle. I free-handed it with scissors, but you can use a punch if you have one.
 
 7. Place labels on Top of lids and tie the rim with baker's twine (I like the twine made by Pick Your Plum best, but you have to wait for it to come up for sale). Thread small, white tag through the twine before tying the bow.  I wrote Thanks for Coming on my party favors and Handmade by and then had my children hand-write their names onto the tag when using for Teacher Gifts.
 
Hope you love this project!  It really couldn't be easier and the results are divine.  Click below to download the pdf of my label sheets.  For personal use only. Not for resale.
 
(This Google Doc is marked SHARE WITH ALL - You do NOT need to email for permission to download and print.)


Dollar Store Kazoo Valentines

2.08.2013


The last few years our family has made non-candy Valentines for their classes. WE have made healthy changes and, honestly, it's just too much candy regardless. This year inspiration struck at the Dollar Store (Dollar Tree to be exact). These little baggies of kazoos came with 12 to a package. Each of my girls has 25 kids in their class so we bought 5 packages (so we would have some leftovers for church/neighborhood friends). 60 Valentines for 5 bucks?! Sounds good to me!


- package of Kazoos (from Dollar Tree)
- clear scotch tape
- printed cards
- paper trimmer (or scissors)

1. Print pdf of cards.  
2. Trim first at 4-1/4", directly down the middle.
3. Trim remaining edges around each card.
 
 
4. Pull 1.5-2"  long piece of scotch tape. Place tape unto kazoo right behind "spout" (what in the heck would you call that sticky-up part of the kazoo?).


 5. Place kazoo on card and press tape down the sides until they meet the paper, then smooth outward.
 
 
I hope this gives you some good ideas for Valentines!  My kids are really excited to give them out!


FREE PRINTABLE: Family Love Boxes

1.08.2013

I made these love box templates last year for my LDS-themed blog and thought I would share them here for you as well. These can be used at any time, or make them around Valentine's Day and spread some Valentine's love throughout your family! These could easily be used for pre-school classes or other teaching opportunities.

CLICK HERE to download BOY, GIRL or BLANK box templates.


white cardstock
coloring tools (optional)
scissors
glue stick or scotch tape
pen


1. Print a box for each family member.
2. Cut out box and love coins.
3. Cut out slot in box lid and add family member's name in the space provided.
4. Use tape or glue stick to construct boxes.
5. On each day choose a family member to highlight and place their box in a prominent place with coins and a pen nearby. Instruct each family member to write something they love about that family member on a coin and place it in the box.
6. At dinner, open the box and read the love coins.
7. Highlight a different family member the next day and repeat steps until each family member has been highlighted.


12 No-Candy Valentines

1.07.2013

UPDATE: Check out the NEW list with 36 NO CANDY VALENTINES here.

Holidays are all about the treats.  So, when I decided to make healthy changes with our entire family recently, I struggled to find non-food celebration items.  I decided to round up a few of my own ideas and some great ideas from other blogger for non-candy Valentines for you to enjoy.
 

(1) Bouncy Ball Valentine by The Crafting Chicks
(2) Free Printable Valentine's Bookmarks by Summit Avenue Design
(3) Ruler Valentine by Thompson & Spring
(4) Silly Straw Valentines by Plucky Momo
(5) Glow Stick Bracelet by Kommuicated
(6) Love Bug Valentines by Dandee
(7) Pencil Valentines by Write with Moxie
(8) Play-Doh Valentines by Paging Supermom
(9) Race Car Valentines by Paper and Pip
(10) Magnifying Glass Valentines by Dandee
(11) Recycled Heart Crayons by The Long Thread
(12) Super Star Glasses by Plucky Momo


Natural Pine Cone Wreath

12.17.2012


I really wanted a big, nice holiday wreath for our front door, but I am sure you know, they're expensive. But, a few weeks ago, as our family walked into church on a Sunday morning, I spotted lots and lots of pine cones on the church grass. They were perfect, light tipped and FREE. I grabbed a plastic bag from the car and enlisted my girls to collecting pine cones. None that were crushed and none that were too big. We filled the bag and I started planning. 
 Last week I was in our favorite Dollar Store (Dollar Tree) and I saw large wreath forms made of braided light wood. They had small and large sizes so I got the larger size. next stop was JoAnn Fabrics, where their holiday stuff is all at least 50% off right now. I found little sprigs of red holly berries for $1 per sprig. I bought three (but only ended up needing two). 
Pine cone wreaths are expensive.  This one costs $80 and this red one costs $108 (you could easily spray paint your finished wreath red if you want)!  The total cost of MY wreath was $3. $1 for the wreath form and $2 for two sprigs of plastic holly berries. Well, and the cost of about 6-8 hot glue sticks....but who counts that?
 
Also, you could definitely add some fake greenery if you want.  And spray paint your finished wreath any color you want.   It's all up to you.  I really like this minimal look.
 
 
- a whole lot of pine cones (I used around)
- wreath form
- hot glue gun and plenty of hot glue sticks
- 2 sprigs plastic red berries 
- strong scissors
- dark brown spray paint (optional)


1. Use dark brown spray paint to coat the wooden wreath form. Allow to dry completely and add a second coat. (I didn't do this step, but wish I had).
 
2.  Take one pine cone and decide which side is best.  Place that side facing up and with your fingers, gently push down the petals (is that what they're called) on the opposite side.  This allows your pine cone to lay flatter against the wreath form and makes attaching it easier.


3. Put a generous amount of hot glue on the flattened petals of the pine cone and press down firmly onto the wreath.  You may need to hold this for a few minutes to make sure it is staying.  Also feel free to add more glue into the cracks while you press down.  It won't show later.


4. Lay another pine cone next to the first one.  Move it around until it fits tightly against the first.  Adhere to wreath.  I chose to vary the direction of my pine cones, but you can have them all facing the same way if you choose.


5. Continue adding pine cones until entire wreath is filled (I didn't cover the back at all, but you could) and no wreath form is showing.  I had three rows.  One that was right on top of the wreath, one that was in the inner circle and one that surrounded the outer edge.


6. When you are done you will notice some gaps where you may see the wreath form where the pine cones didn't fit super closely together.  Use your hands or the strong scissors to cut small portions from additional pine cones and hand glue them in.  Sometimes I added just two petals to fill a spot.  This is where pre-spray painting the form would come in handy.


7. Use scissors to remove berries from their stems.  Add hot glue to one side and press firmly into wreath in varied patterns, sometimes bunching two and three together.


Note: If you find you have hot glue "strings" on your project when finished (I sure did) use a hair dryer on the hottest setting and carefully blow the strings until they melt and disappear.