Showing posts with label Paper Crafts. Show all posts

Upcycled Gift Card Holder

12.16.2011


Sometimes you think of something and you know, right away, that it. is. genius. This was one of those ideas. Last month before Thanksgiving my husband and I did Phase One of the South Beach Diet of which these low calorie cheeses are a staple. We bought a box of every variety, leaving me with 6 empty boxes when we were done. I saved them...for what? I wasn't sure.

Then in late November we had the Ahern family Christmas gift drawing and our family drew my niece and nephew ages 12 and 10 whose Christmas wishes were for iTunes gift cards. Then, it hit me! Here are the finished boxes. They turned out even cuter than I had imagined. Love this project.


- laughing cow cheese box (with cheese removed...ick)
- 1 piece of double sided 12x12" patterned paper OR 
2 pieces coordinating one-sided patterned papers
- paper trimmer
- glue stick
- scissors & pencil (not pictured) OR circle cutter


1. Carefully peel off box top label and side labels.


You can leave the box bottom label on. It is adhered MUCH more permanently and will be too difficult to remove.


 2. Cut 3 strips of paper using your paper trimmer.  Each strip should be this wide.  Now exactly what is that measurement? I dunno. Halfway between 1/4 and 1/2 inches.  6/16ths of an inch...maybe?


3. Next you make the top and bottom circles in one of three ways.
A. Trace your lid and eyeball while cutting to make the circle 1/4" less all the way around.


B. Cut a circle using a circle cutter. The circumference is 4" across.
C. Find something that is 4" across and trace that.  The bottom of my Lysol cleaning wipes was perfect...


Now you should have three strips and two circles.


4. Run glue stick well over back of narrow strip. Slowly glue it around circumference of box, covering where the label used to be.  You'll notice a small gap (the 12" paper doesn't quite reach around). 


5. Cut one of the other strips to 2&1/2 inches long. Glue this piece over the gap, matching patterns as best as you can. (But seriously, don't stress if it's not perfect. No biggie!)  Repeat with bottom of box.


6. Use glue stick to adhere circle of patterned paper to the top and bottom of the box.


7. Embellish with cut paper, scrapbooking supplies, chipboard letters, flowers, etc.  Then put your gift card inside (nestled in tissue paper if you want).


Here's one I made for my 12 year old nephew.  I kept it very minimal and masculine.


I hope you like this easy and eco-friendly way of re-using cheese boxes and dressing up gift cards this holiday season (and all year long!)

Tutorial: Paper Storage Rack

1.05.2011

You'll forgive me for repeating a post from way back.  I wanted to make sure that the new readers here got to see this tutorial and these WIRE STORAGE GRIDS are going to make various appearances this month in my Organized&Inspired event!  So go and buy some...a.s.a.p!  They're fantastic!

By slightly modifying white wire storage grids you can create a personalized paper storage system which will hold any amount of 12x12 papers in an efficient and very organized way. And it's wicked cheap. I'll go through the steps of making your own here.


1 box Wire Storage Grids (available at Target and Walmart) cost: $15-20
1 package Zip/Cable Ties (available at any home improvement store) cost: $1-2
1 wire cutter or seriously heavy duty scissors


{Make sure your grids measure at least 12" square so your paper will fit. Mine are 13" square...perfect.}


1. Start by throwing out the weird little white plastic clips that come with the cubes. You won't be needing these.


2. Build a basic cube (leaving one side open as shown above) by attaching the grids together using your zip ties. Make sure the little square nubbies are facing towards the outside of your cube so they don't catch on the paper. (photo below)


3. Next take the remaining white shelves and slide them into your cube and attaching them at 1 inch intervals where the grid already exists. If you need a larger slot for some paper sets just make it a 2 or 3 inch interval instead.


Make sure when you slide a shelf in that the wire grids are on the underside so that you get a slight lip on your paper tray. (photo below)


4. Use your wire clippers to remove excess plastic end from zip ties.


Fill with paper sorting by color, manufacturer or whatever makes you happy! Voila! Isn't it genius?!! I made 3 separate cubes out of 2 boxes of these grids and had some grid pieces leftover. I have even given these cubes as gifts to fellow scrapbookers with rave reviews!


I think these are a great solution for organizing a paper-crafting area on a budget.
I would love to know your thoughts!


FREE Lyrical Love Cards

2.08.2010

Remember the first time you fell in love? And I mean really fell head over heels in love? And you turned on the radio and all of the sudden every cheesy love song seemed to be written just for you? Songs you once scoffed at caused a contented sigh to escape your lips.

So, this year I decided to take my inspiration from music...more specifically, from really cool love songs from different eras. Here they are for FREE download. Just cliock on the card you want. They are designed as 6.5" tall x 5" wide, but you can trim them however you like. A 5" square could be really cool.


Tutorial: December Daily Record

11.30.2009


(Click to Enlarge)

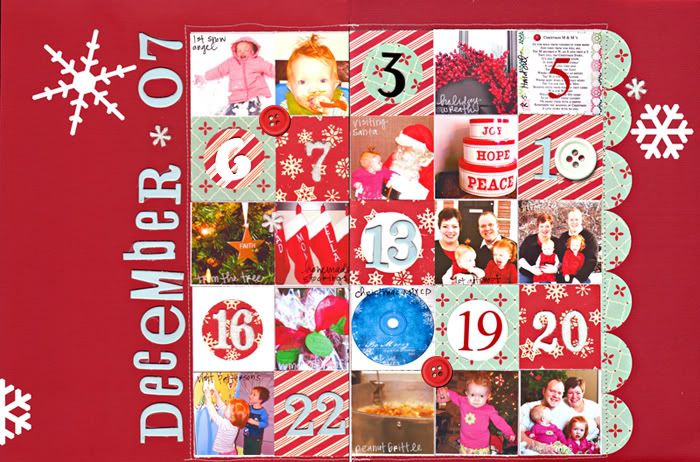
This tutorial adapts the December Daily Album that Ali Edwards does each year (isn't she a genius?) and making it a bit smaller and easier to chew. I tried her idea last year and failed miserably...so this year, try an easy-peesy version that can be completed in less than one hour....yes, you heard me right....less than one hour.This project can be either 8.5x11 or 12x12* depending on your preference.


- 2 pieces 8.5x11 red cardstock or 1 piece 12x12" red cardstock
- 2 pieces white cardstock
- Your favorite Chipboard Alpha
- Marvy Circle 1.5" circle punch
- Good Cheer line by October Afternoon
- 2 or 3 red and green buttons
- assortment of all of your leftover numbers from stickers/chipboard alphas
- Heidi Swapp Snowflake Ghost Shapes or diecut paper snowflakes
- White and black photo pen.
- Paper Trimmer
- Sewing machine (optional)

Downloadable template for calendar base. Click here to download for FREE!
(Yeah, I'm cool like that.)

The following steps should either be done now, before December 1st and then filled in as you go along or between December 26-30 while the month is fresh on your mind.

- Open template using Microsoft Word. Print calendar template onto white cardstock. Trim around edges of grid.


- Adhere to layout lining inside edges straight along edge of red cardstock.


- Use a 1.5" circle punch to punch 4-5 circles of patterend paper.


- Use a trimmer to cut cricles in half.


- Line half circles along right edge of white grid to form scalloped edge. Adhere to layout.


- Sew a straight line stich around edge of your grid, going directly over your scalloped edge as well.


- Use white, red, green or other coordinating chipboard alphabet to write December 2008 along left side of white grid.


- Using a 2" square punch or trimmer to cut squares of multiple patterend papers from your hoilday paper line. Punch a few with your circle punch as well.


- Set these small papers aside in an envelope. Store with other supplies.

Throughout the month of Decemeber do the following...

- Take photos and keep a record of activities done on each day of the month (if you don't write it down, you will forget). Don't worry if you miss a day, you'll want to have a number of empty spaces on your grid by the end. You may choose to only include holiday themed activities or document all occurance throught the month of December.

When you're ready to assemble your page...

- Pull out stored supplies. Print out photos from month of december.


- Choose which photos and memories you would like to display on your layout. Trim photos to 2" squares.

- Place photos on white grid on appropriate dates first. Use a white or black pen to write short descriptions of photos directly on the photo.


- You should have some empty squares leftover. Place punched squares of patterned paper on empty grid spaces. Making sure you use a random mix. Add some circles of patterned paper to the middle of a few of your squares.

- Take any coordinating chipboard or sticker numbers and lable date numbers on free squares.


- Add a few colored buttons to corners to break up and soften grid lines.

- Add Ghost or paper Snow Flakes to "white space" of layout edges.

*To adapt this layout to a one page, 12x12" layout, print the grid to the same size and configure your layout like the example below.


Hope you love this idea and that you can use this simple project to document a frenzied month that means so much to your family. This same layout could be easily adapted to Hannukah or other alternative holidays besides Christmas.

Tutorial: So Thankful Mini Album

11.15.2009


In 2007, we had our last Thanksgiving in Utah. By the next year we had moved lock, stock and barrel to the East Coast and away from family. But back in 2007, amid the food, football and family fun I did something for which I am infinitely grateful. I took 20 minutes and made a mini album which was used to record our family's Thanksgiving celebration and what we were thankful for.

I had completely forgotten about this small album until last month, when I unpacked it from a box filled with scrapbooking albums. I eagerly grabbed it and read through it, amazed at how young we looked and remembering how good that Thanksgiving was.
Here are all of the instructions you need to assemble the same mini album for your Thanksgiving feast. Take 20 minutes and assemble it now so it's ready to plug info into by Thursday. Here's what you'll need.


 - Downloaded digital pages by Jessica Sprague (my digi hero). Click here.
- One, 4x6" mini photo album. These can be found at Dollar Stores or in WalMart for $1.00
- Photo printer OR access to an online printing site where you can load your pictures and have them printed. WalMart, Sams, Costco and most stores with a photo section have this.
- a razor blade
- One, acid free, permanent marker. Yes, this can be a Sharpie fine point or Sharpie pen.
- Your camera


- Download digital jpg files from the link above. Save to your computer.
- If you want the same back cover I used (see below) click here to download. I made this by slightly altering Jessica's design. Save to your computer.
- Upload the files to a photo printing site and print a front and back cover and as many "list" pages as need for each member of your family. Print as 4x6" photos.
- Load cover photo into cover of album. Leave at least two pages after the cover for photos from the actual dinner table, of extended family and of your family together. Load remaining pages and slide back cover into back cover of album.
- Use a razor blade to carefully remove excess pages from your album. You may also choose to skip this step and add to the same album each year until it is filled.
- At Thanksgiving make sure to snap a photo of each individual member of your family and have someone else snap a photo of your family all together. Take enough shots so you know you will have some good ones to work with.
- Either during or after dinner ask each member of your family three or four things they are thankful for. Use your sharpie to list them in the book. If you have small children who cannot yet speak, just write down three or four of their favorite things. A blanket, a sibling, etc.
- As soon as Thanksgiving is over, upload your photos from the event and send them to be printed. Be sure to pick them up on Black Friday or on Saturday. If you wait to do this step, it will get lost in the shuffle of Holiday activities and never get finished.
- Load individual photos into your album with the corresponding thankful list. You're done!

Finished Project
This is what mine looked like in 2007. That year I chose to bind it myself with rings and mount each page on chipboard, but this year I will probably go with the pre-made inexpensive album.

Not sure why the photos I took of the finished album were so crummy, but...you get the idea.


I really hope you get a chance to make this project. It is really a simple one to do and it is priceless. In past years, I have even made one for each family in our extended family attending the same Thanksgiving celebration along with an acid free marker. It's a great gift!