Showing posts with label Organization. Show all posts

Hair-Bow Holder

1.26.2011

Remember this amazing tutorial from my new friend, Jess, which was posted here last week?

This past weekend I whipped one up and I love it! Between this our elastics mini zipper case and our headband holder....we're in organizational heaven. At least where girls' hair items are concerned.


We went with a very bold, modern print. I got 5 yards of this fabric in a clearance bin at Wal*Mart over the Summer for $1/yd. When rifling through my ribbon stash I realized I had a HUGE assortment of black and white ribbons. Because the print was so bold, we stayed in that color pallet (and made the Headband holder in the same color scheme).

Guest Tutorial: Organization Tips

1.25.2011


Hey everyone!  This is Cheri from I Am Momma - Hear Me Roar.  Emilie and I go way back....well at least to June :)  We competed in SYTYC together and she made some amazing things.  I am excited to be a part of this organizational series.  Why?  Because when I finally conquer an area of my home and fully organize it I feel like I can conquer the world.

Today I'm going to show you what my unsightly cabinets over the desk area in our kitchen looked like.  Yup.  It was bad.  There was no real structure, which means it became the collection area for all random objects.  I wanted to make the space logical and organized.


So, after an afternoon of sorting, labeling, and more sorting.......we arrived at this.   Ahhhh!  So much better!  Now there even room for growth.


So, I'm going to share four tips with you to help in organization.  Let's hit it!

1) Containers are obviously a must.  When dealing with small objects, you just need containers.  It's nice to use the same ones so that the area will have some consistency.  The silver bins are from Target.  I found them in the dollar section, but they were $2.50 each.  Not bad. 


These stackable shelves were from DI.  (Maybe it's Goodwill where you live.)  This is a great place to find cheap bins and containers.  They were $. 75 each and at Wal-mart the cheapest thing I saw that was similiar was $8.


This little puppy helped a ton!  It was also $2.50 at Target and it perfectly houses all those tiny little knick knacks that don't really have a place.


See?  Yeah, I bet you have most of these random little items, too.


I also got a little container for my coupons, which helps me remember to use them.


They are divided by catagory.


2) Labels.  I LOVE labels.  They are so nice because then everyone knows where things go - not just you.  I created these with my Silhouette machine, but you could also order some HERE.  (She takes custom orders as well.)  Don't labels make everything look nicer?


3) Find the right place.  Put the things you use all the time in the most reachable area.  Use bins for storage that's up high.  Then the bins are like drawers and you can access things by just bringing it down, rather than climbing up high to see what exactly all the small items up there are.  Try and keep dangerous things out of the reach of your little ones.


4) Once you've got your system down - USE IT!  If you start to casually leave things out or stop putting them back where they go it won't take much time to be back where you started.  Ugh!  Not pretty.

That's it!  So, pick an area of your home and TACKLE it!  It feels so good when it's done.  I'm off to find another area right now.  Thanks for having me, Emilie! 

All of you are welcome at my place anytime. -Cheri

Tutorial: Headband Storage

1.24.2011


My children love headbands, but I hate them. Not because they aren't cute, but because we have never had a decent way to store them. This means they end up everywhere and I can't stand it. Last week, I was playing with one found underneath my computer desk in our basement and happened to have a tower of blank CD's next to me. That's when i realized it would slide right onto the CD tower, but that the CD tower was too slippery to hold.

I went on a hunt for a container similarly circumferential and found the answer in my kitchen. And oatmeal container. Add some cute paper and ribbon and you have an headband holder everyone can love. So let's get to it!

1 full sized oatmeal container
2 pieces of patterned scrapbook paper of same design
scrapbook adhesive runner (or other adhesive option)
17" grosgrain ribbon (or other non-slipper ribbon)
paper trimmer (or ruler and scissors)
hot glue gun to secure lid (optional...read more in step 10 below)


1. If you need to buy a new container for this project empty the contents of your oatmeal container into a gallon ziplock bag and store for later use. Copy cooking instructions from container onto ziplock front with a permanent marker.

2. Measure the height of your oatmeal container. Mine was 9&1/2” tall from UNDER the lip to the bottom. Take off ¼” from that measurement.

Your paper will not need to come all the way down because you will be covering the bottom with ribbon. I found out the hard way that it’s too difficult to get the bottom edge exactly right with the paper only.


3. Cut both pieces of 12x12 patterned paper to 9&1/4” high. Set one piece aside. Cut the other to 5 inches wide.


4. Cover the back of your 5x9&1/4” piece with adhesive. I used a scrapbooking adhesive roller to achieve this, but you could try glue stick or other adhesive that won’t cause bubbling.

5. Place this piece over the back seam of your oatmeal container and adhere to box. Make sure you line up the paper under the top rolled lip of the container.


6. Put adhesive onto back of 12x9&1/4” patterned paper. Adhere to container, making sure it will properly cover both edges of back paper piece.


7. Cut length of ribbon to 17” long.


8. Fold one edge of ribbon back ¼” and secure to create finished edge. Cover back of ribbon with adhesive.


9. Adhere to bottom edge of oatmeal container, cover paper seam.  Make sure you glue down the unfinished edge first and overlap it with the edge you taped down on top.  I used a dot of Hot Glue to secure ribbon onto container, since scrapbook adhesive sometimes doesn't stick as well to grosgrain ribbon.


10. Use hot glue to fix plastic lid permanently onto oatmeal container. This step is optional, you may also choose to store barrettes or flowers for hair inside the container, but my kids would figure out this was a vessel and fill it with something, likely water, within the first ten minutes. So I glued down my lid!

11. Store headbands on container. They stay put, but slide on and off easily and it can hold up to 20 headbands, depending on thickness. Wowza! That’s a lot of headbands! 

Note: the top headband is a stretchy baby headband (see my easy tutorial here).  They fit on and stay as well, just be sure if you have a newborn baby that they don't overstretch to fit the container or they will become too stretched out to stay on baby's head. 


Now seriously, is that not cute and functional!?!
Between this and the hair bow holder tutorial you'll be all set!

Do you have a solution for storing the headbands in your house?
Or are you heading to the cupboard to grab your oatmeal box right now?
Please share!


Tutorial & Photoshop Template: Recipe Cards

1.21.2011


Hey friends of Plucky Momo!!

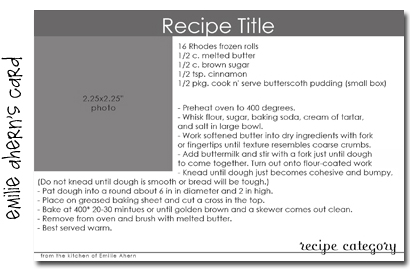
My name is Emily from, iCreate...with Love, and I'm so excited to share with you a project I worked on for almost all of last year.  Last spring, I decided I wanted to make recipe books for all of my family. They are always asking for recipes from me, and we have a lot of recipes that remind us of our childhood.


(1) a recipe card template
(2) Photo Book designed to hold 4x6" prints
(3) Adobe Photoshop or other photo editing software
 You can download Emily Merritt's template HERE.

You can download Emilie Ahern's template HERE.

It's easy as pie...I began by writing down a list of all of the foods that I loved and wanted in a recipe book. And I got to work. It took me the better part of 2010 to finish and in December I think we ate huge meals with lots of recipes because I was trying to get it all done in time! 

If you don't feel you are a great photographer and want to finish more quickly, go ahead and a do Google image search for photos of recipes you make.  Try and choose one that looks like how your finished recipe looks.  And you don't need to worry about copy write as long as this is just for your family to enjoy!

*FOR A GREAT TUTORIAL ON USING LAYERED
TAMPLATES IN PHOTOSHOP CLICK HERE.

I added my photos onto a card with the recipes, printed them out on my home printer (but you may also choose to have 4x6" prints printed at a photo lab) and put them in a simple photo book.


I'm so thankful Emilie let me share my recipe book with you!
 Come stop by and see me on my blog sometime! :)
I'd love to have you!

Inexpensive Small Item Cases

1.20.2011

We all have some certain item(s) in our homes that never seem to have a place to stay.  These things usually end up in the "Junk Drawer".  But what if you don't have a Junk Drawer?  We don't.

And so, this year I decided to make a "Junk Box". Although (in behalf of safety pins everywhere)  I resent the term "junk".  So I call mine a "Odds Box".  I keep it on a shelf in our pantry and ever since it was created my life has been easier.

I use a clear school case (oh yes, I love these) for new batteries.  I store postage stamps in a small envelope inside.  Now, let's get to the safety pins and hair elastics.

Last week I ordered 2 Custom mini Coin Purses from ARTSCOW.com for a total cost of $3.49 (and that includes shipping).  I designed them specifically for certain items and I cannot wait to get these, fill them, and add them to my Odds Box.  Here's how you can make yours too!

1. Click here to go to Artscow.com and click on CUSTOM MINI COIN PURSE.


2. Choose CREATE IT!
3. Create two jpg images in Photoshop (one for the front and one for the back) to illustrate the items you will be storing inside.  Load images as prompted and add to cart.  Then design your second coin purse in the same way.
4. Enter code MCP4FRDS at checkout to get the special low price (note: I am not sure if/when this code expires, so don't wait!)

The top row is the one I created to hold all of my safety-pins. 
The bottom row is the one I designed to hold the tiny, clear hair elastics I use in my girls' hair.

I'm sorry, but aren't these cool?  I'm just sayin'...I liked the way they turned out.  I can't wait to get my small package from China (where Artscow is located) and pack my little organization coin purses into my Odds Box.

Of course, if you already have and Odds Box or a Junk Drawer you might still find a use for these.  here are a few uses I thought of...

- store band aids in your car glove box
- keep a variety of change inside and store in car glove box for use at tolls.
- store spare watch or hearing aid batteries.
- or anything else that comes has many little loose parts and is packaged without a container.


Guest Tutorial: Hairbow Holder

1.11.2011


Hey, Plucky Momo readers!

My name is Jess, from Craftiness is not Optional, and I'm here to share a fun and easy organization project for you!

Have hair bows and clippys started taking over your life?
Do you find them literally everywhere? Pockets, shoes, fridge?
Then you definitely need one of these!

A pretty, and handy way to corral all those bows.


 frame
cardboard insert
fabric (and batting if you wish), cut to overlap cardboard by about an inch
various matching ribbons
and your trusty glue gun


First, make sure you iron your fabric so it's nice and smooth. No one wants to hang up wrinkly fabric. 

Then line the fabric and batting up, flip over, and...

 
Glue the edges down!

don't get your fingers with the glue gun.

Fold the corners like a present, or just glue them as best you can like I did. Nobody's gonna see the back, unless they take it off the wall just to nitpick about a messy back. Those people should stay away from my house.


Lay your ribbon over the top and cut with an inch or two extra to wrap around the back.

Pin the ribbons in place. Flip over the board.

again, glue gun to the rescue. you know what to do.

Pop it in your frame, and tada! You're done! Fill 'er up with clips and such, and you're in business. Of course, my daughters have so many that you can't see the fabric, so I had to remove some. Yikes.


Thanks, Emilie and readers, for having me! Come by and visit sometime! :)