Showing posts with label Simple Solutions. Show all posts

FREEBIE: Back 2 School Binder Printables

9.09.2013

Maybe it's because I am currently 8 months pregnant, but I have the overwhelming urge to be more organized this school year. My daughters just started 3rd grade and 1st grade. I needed a system to keep their important papers, artwork and report cards, all in one place. I got the idea to make a School Year Binder for each. And since school supplies are still at good prices, this is a great time to set one up.

(1) 1 or 1&1/2 inch binder for each school child
(1) set of binder dividers with 5 tabs
  10-20 plastic sleeves
hole punch (optional)
Downloaded binder inserts by Plucky Momo (download link below)

1. Print binder cover page onto un-textured cardstock.  I buy mine from Wal*Mart and it's the perfect weight and super-cheap.

2. Fill out (or let child fill out) binder cover page.  Slip into front of binder.


3. Print School Day Photo page, attach first day photo, and insert it into first page protector in binder OR hole punch the edges and add to binder.

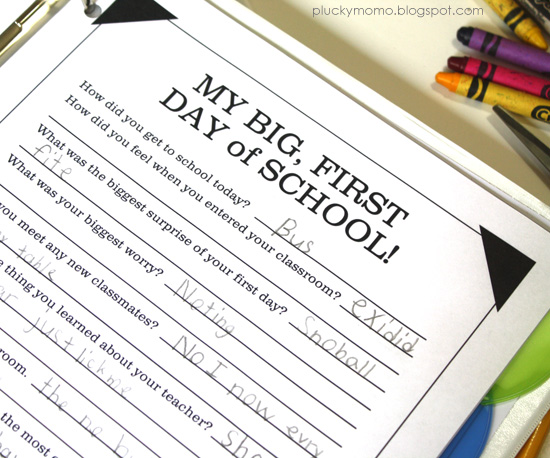
4. Have (or help) child fill out the questionnaire about their first day of school insert it into next page protector in binder OR hole punch the edges and add to binder.

5. Label 5 tabs as follows..


Great Grades: Put completed tests, homework and other projects which received great marks.
Awesome Awards: Certificates from school, grades, sports, etc go here.
Friends & Fun: I will put birthday party invites from school friends, notes from buddies, etc, here.
Report Cards: Place report cards and progress reports here.

Amazing Artwork: Artwork and coloring pages from school.  Be sure to date each item on the back before you insert it into your plastic sleeves.  If an art project is larger than 8.5x11", scan or take a photo of it and print it onto 8.5x11" paper.

(or customize categories to suit your needs).


6. Put these binders in a central place and put papers into them as soon as they return home.  This will ensure you keep everything organized and in place.  Add more page protectors as needed.

7. At the end of the school year take a photo and place it on the School Day Photo page. Have child fill out Last Day of School questionnaire.  Then, flip through the book with your child in the first week of Summer and re-discover the wonderful school year they had!



Simple Solution: Game Piece Bag

1.13.2013


I am a little OCD about game pieces. Okay, a lot OCD.

When I was young I would have special rubber bands, that I actually bought with my allowance, that I would use to make the game cards organized. Especially when it came to Monopoly. Communinty Chest cards...bundled. Chance cards...bundled. Property cards...bundled. Money...bundled. Game pieces in baggies.

So, today when I sat down to play Sorry for the first time with my kids I was appalled that there was no organization system. Not even a sad, little, white, cardboard box! Sheesh.

When we finished playing I spotted my sewing machine on the floor next to the Dining Room table (because I'm messy like that) and I got a great idea. I sewed a straight stitch up the middle of the ziplock baggie. Then the cards slipped perfectly into one side and the game pieces in the other. Brilliant! (if I do say so myself) 


I may or may not be obsessively sewing ziplock baggies for the next hour or two.  So don't call me, I'm busy.


Never Forget a Birthday!

1.08.2013


Confession: I am a Birthday freak.

In case you didn't notice I love my birthday, but do you know what I love even more? Everyone else's birthdays. I am really good at remembering birth dates.  Not sure why.  But I also have an amazing system in place just in case my life gets crazy.  I thought I would share with you in case you want to step up your birthday remembering in 2013.  

TOOL #1: BIRTHDAY ALARM

BirthdayAlarm.com is totally free.  I started using this service probably 5 years ago.  It is awesome.  You could ONLY use this service and you would be all set.  You plug in birthdays, anniversaries and special occasions for friends and family (with an option to send them an email requesting them to add their birthday to your account, but the requires them signing up as well). Then you can set reminders to be emailed to you.
 
I have every one's birthday (and a few anniversaries) in my account and I signed up to receive two reminder emails.  One email 10 days before the event.  This gives me plenty of time to buy a card and mail it OR send a specialty card via Treat (see below).  I also receive an email ON their birthday. This reminds me to call them and sing Happy Birthday to them in a really loud and purposefully off-key opera voice on their special day.

Birthdayalarm.com offers digital cards which are hideous and outdated.  Don't use them, people.  Just don't.


TOOL #2: TREAT
 

Two years ago I added Treat.com to my birthday tools and I am in love. Treat.com is a greeting card service.  They have a gazillion card options for you to choose, personalize and mail to yourself or directly to your birthday boy/girl.  The card options are awesome and the quality is really amazing. They have cards you can add photos to and non-photo cards as well.  Like this photo card for my SIL, Alison or the non-photo option we recently sent to our nephew, Porter.


Cards cost $3.49 each.  However, you can also sign up for the Treat Card Club bundles you can buy.  You can buy an 18 card bundle, 12 card bundle or 6 card bundle.  The 18 card bundle is a one time payment of $35.82 and that makes each card just $1.99 each.  You can add $0.44 to your order and Treat.com will stamp your card and mail it directly to the recipient.


Another great thing about Treat.com is you can add a Gift Card from Tango Card.  They'll print a gift code inside of your card. The recipient can redeem it for gift cards from a variety of popular retailers, donate the amount to charity or redeem it for cash. Recipients can choose a gift card from one of ANY of these retailers:  Amazon, Facebook, Fandango, Gap, Groupon, Home Depot, Nike, Pottery Barn, REI, Rixty Spa, Finder,  Starbucks, iTunes, Target, Zappos, or 1-800 Flower.

Cool right?  This is particularly awesome when sending a gift to my 13 year old nephew.  Do I know what 13 year old boys like? Nope. But this takes care of it.  You can choose any amount from $10-$200.

Oh, and you can also design the card and choose any future date to mail it.  Sometimes I design all of them for a given month at one time and then set the mailing dates for one day before their birthday.  Then I just make the phone calls on their birthday and I'm all set!

Treat.com also has a reminder system which is linked to your Facebook account to search for birthdays.  I don't use them because there is not option for a reminder on their actual birthday, just one day before, and in one week increments before that.  If you don't mind that just skip birthdayalarm.com and go straight for treat.com's reminder service which is also free.


Hair-Bow Holder

1.26.2011

Remember this amazing tutorial from my new friend, Jess, which was posted here last week?

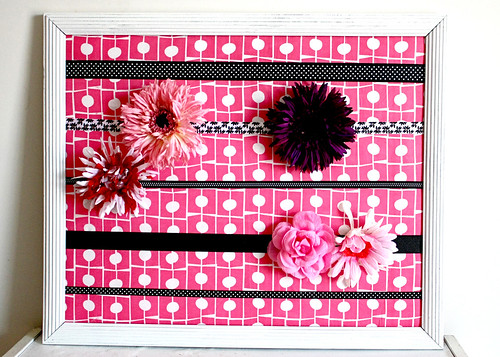
This past weekend I whipped one up and I love it! Between this our elastics mini zipper case and our headband holder....we're in organizational heaven. At least where girls' hair items are concerned.


We went with a very bold, modern print. I got 5 yards of this fabric in a clearance bin at Wal*Mart over the Summer for $1/yd. When rifling through my ribbon stash I realized I had a HUGE assortment of black and white ribbons. Because the print was so bold, we stayed in that color pallet (and made the Headband holder in the same color scheme).

Tutorial: Headband Storage

1.24.2011


My children love headbands, but I hate them. Not because they aren't cute, but because we have never had a decent way to store them. This means they end up everywhere and I can't stand it. Last week, I was playing with one found underneath my computer desk in our basement and happened to have a tower of blank CD's next to me. That's when i realized it would slide right onto the CD tower, but that the CD tower was too slippery to hold.

I went on a hunt for a container similarly circumferential and found the answer in my kitchen. And oatmeal container. Add some cute paper and ribbon and you have an headband holder everyone can love. So let's get to it!

1 full sized oatmeal container
2 pieces of patterned scrapbook paper of same design
scrapbook adhesive runner (or other adhesive option)
17" grosgrain ribbon (or other non-slipper ribbon)
paper trimmer (or ruler and scissors)
hot glue gun to secure lid (optional...read more in step 10 below)


1. If you need to buy a new container for this project empty the contents of your oatmeal container into a gallon ziplock bag and store for later use. Copy cooking instructions from container onto ziplock front with a permanent marker.

2. Measure the height of your oatmeal container. Mine was 9&1/2” tall from UNDER the lip to the bottom. Take off ¼” from that measurement.

Your paper will not need to come all the way down because you will be covering the bottom with ribbon. I found out the hard way that it’s too difficult to get the bottom edge exactly right with the paper only.


3. Cut both pieces of 12x12 patterned paper to 9&1/4” high. Set one piece aside. Cut the other to 5 inches wide.


4. Cover the back of your 5x9&1/4” piece with adhesive. I used a scrapbooking adhesive roller to achieve this, but you could try glue stick or other adhesive that won’t cause bubbling.

5. Place this piece over the back seam of your oatmeal container and adhere to box. Make sure you line up the paper under the top rolled lip of the container.


6. Put adhesive onto back of 12x9&1/4” patterned paper. Adhere to container, making sure it will properly cover both edges of back paper piece.


7. Cut length of ribbon to 17” long.


8. Fold one edge of ribbon back ¼” and secure to create finished edge. Cover back of ribbon with adhesive.


9. Adhere to bottom edge of oatmeal container, cover paper seam.  Make sure you glue down the unfinished edge first and overlap it with the edge you taped down on top.  I used a dot of Hot Glue to secure ribbon onto container, since scrapbook adhesive sometimes doesn't stick as well to grosgrain ribbon.


10. Use hot glue to fix plastic lid permanently onto oatmeal container. This step is optional, you may also choose to store barrettes or flowers for hair inside the container, but my kids would figure out this was a vessel and fill it with something, likely water, within the first ten minutes. So I glued down my lid!
11. Store headbands on container. They stay put, but slide on and off easily and it can hold up to 20 headbands, depending on thickness. Wowza! That’s a lot of headbands! 

Note: the top headband is a stretchy baby headband (see my easy tutorial here).  They fit on and stay as well, just be sure if you have a newborn baby that they don't overstretch to fit the container or they will become too stretched out to stay on baby's head. 


Now seriously, is that not cute and functional!?!
Between this and the hair bow holder tutorial you'll be all set!

Do you have a solution for storing the headbands in your house?
Or are you heading to the cupboard to grab your oatmeal box right now?
Please share!


Guest Tutorial: Hairbow Holder

1.11.2011


Hey, Plucky Momo readers!

My name is Jess, from Craftiness is not Optional, and I'm here to share a fun and easy organization project for you!

Have hair bows and clippys started taking over your life?
Do you find them literally everywhere? Pockets, shoes, fridge?
Then you definitely need one of these!

A pretty, and handy way to corral all those bows.


 frame
cardboard insert
fabric (and batting if you wish), cut to overlap cardboard by about an inch
various matching ribbons
and your trusty glue gun


First, make sure you iron your fabric so it's nice and smooth. No one wants to hang up wrinkly fabric. 

Then line the fabric and batting up, flip over, and...

 
Glue the edges down!

don't get your fingers with the glue gun.

Fold the corners like a present, or just glue them as best you can like I did. Nobody's gonna see the back, unless they take it off the wall just to nitpick about a messy back. Those people should stay away from my house.


Lay your ribbon over the top and cut with an inch or two extra to wrap around the back.

Pin the ribbons in place. Flip over the board.

again, glue gun to the rescue. you know what to do.

Pop it in your frame, and tada! You're done! Fill 'er up with clips and such, and you're in business. Of course, my daughters have so many that you can't see the fabric, so I had to remove some. Yikes.


Thanks, Emilie and readers, for having me! Come by and visit sometime! :)


Tutorial: Easy Thanksgiving Recipe Book

11.20.2010

Because we live far from family, I cook our Thanksgiving Dinner each year.  This leaves the burden on me and my hubby to make all components of the meal....and this can get rather dicey.  Over the years I have learned a lot from making these holiday meals on our own...

- Timing is everything
-  Organization is key
- Anything you can do to make this process easier is worth doing.

So, earlier this year, I printed our go-to holiday recipes, organized them by which recipe should be started first (the Turkey, then the stuffing, etc) and laminated the entire thing. This way I don't have to dig through a recipe book and I can spill stuff on the recipes and then wipe clean.


- cardstock in plain white and autumn colors
- a word processing program (like Microsoft Word)
- a Purple Cows Laminator (read my full Product Review here)
- free clip art
- hole punch
- binder ring


1. Open your word processing program and create a new document.
2. Go to "Page Layout" and change all margins of your document to .5"
3. Then slide the rulers along the top of the document to make your document 5&1/2 inches wide. Slide the ruler from the bottom upwards to make your document 3&1/2 inches tall.


4. Type the recipe for your dish into the document, making sure it fits on one page. Even if the text looks small, it will be easily readable. Make sure you note the cooking time at the top of the card right beside the title.
5. Print onto white cardstock.
6. Use a trimmer to cut out to a 4x6" card. Repeat with other recipes.
7. Make a cover by cutting your colored cardstock into 4x6" and putting a title and clip art onto white paper and mounting it onto your cover.
8. Laminate all cards.
9. Put cards in order of time they take to prepare, starting with the longest cooking time and ending with the shortest.
10. Using hole punch to punch top left corner and secure cards together with a ring.