Showing posts with label Parties. Show all posts

Train Party Invite

8.18.2013


I worked on this cute Train Birthday Party 
invite for my Nephew's birthday this week...
Inspired 100% from this one found on Etsy.  
So cute right?
If you want one for YOUR party be sure to check out 
the shop on Etsy!


Evangeline's 6th Birthday Invites

2.21.2013

Yeah, it's "Birthday Season" at my house.  It drives me a bit crazy.  We have three birthdays in the span of two months and during those two months I am sta-ressed.  Partly because I freakin' love birthdays so I go all out and drive myself to crazy-land.  So really, it's my own fault.
 
My Evangeline is turning 6 on March 15 and she helped me design these invites.  She was pretty particular about changing my original background designs (retro flowers, chevrons and polka dots) to her preference...diamonds.
 

I did have the good sense to plan all birthday parties outside of my house this year since we have so many other things going on, a baptism coming up AND out of town guests to boot!


EASY handmade sugar scrub

2.20.2013


My girls and I had a Valentine's party this year for their favorite friends and their Mommies (who also happen to be MY favorite friends). We made favor bags for the little girl guests, but I also wanted to make a favor for the Moms. I whipped up this simple sugar scrub for hands as favors. My kids also mixed up their own batches for their school teachers. I saved one of the favors for me and I am IN LOVE! This made my hands so soft and it couldn't be easier.

 
4 oz. jelly jars with lids (or 4 oz baby food jars with lids)
one bottle liquid handsoap
white granulated sugar
food coloring (optional)
 
to decorate: twine, small tags, sticker paper, download of printable labels


1. In a small bowl pour 1/2 cup sugar.  Of course, you can make this in a much larger batch and then just divide it into the jars.  

2. Add 1 Tbsp. liquid hand soap.  Choose a soap that is the color you want to go along with your theme and which smells really good.  I used Dial Pomegranate and Tangerine.  I measured this once by counting the "pumps" it took to get 1 Tbsp. and then just pumped it without measuring there after.
 

 3. Mix well with a spoon.  It's going to feel too dry, but just keep mixing. You want a very tight scrub. If you add too much liquid soap it will separate while in the jar. Yuck.
 
 
4. If you want a deeper color to go with a party theme you may add a very small amount of gel food coloring. I used Wilton in mine.  I did test it and it in no way colors your skin. If you choose to deepen the color you want to make one large batch so the color matches in each jar.
 
 
5. Spoon by half-cup fulls into your jars.
 
6. Print sheet of labels (either pink or grey...please don't request custom colors...the grey will match with everything!) Cut around each circle. I free-handed it with scissors, but you can use a punch if you have one.
 
 7. Place labels on Top of lids and tie the rim with baker's twine (I like the twine made by Pick Your Plum best, but you have to wait for it to come up for sale). Thread small, white tag through the twine before tying the bow.  I wrote Thanks for Coming on my party favors and Handmade by and then had my children hand-write their names onto the tag when using for Teacher Gifts.
 
Hope you love this project!  It really couldn't be easier and the results are divine.  Click below to download the pdf of my label sheets.  For personal use only. Not for resale.
 
(This Google Doc is marked SHARE WITH ALL - You do NOT need to email for permission to download and print.)


Kid's Bee-Day Party!

10.22.2012


This past weekend was my daughter Bianca's 2nd Bee-day Party. I chose a bee theme. Here are the invites I designed in Photoshop and sent out to her friends.


Each guest got a handmade Bumble Bee headband upon arriving at the party. These were so easy to make using pipe cleaners, black headbands and black pompoms. A glue gun makes magic!


I went a little berserk with the table. I made the tissue pom-poms from dollar store tissue paper and garbage bag twisty ties. Easy peasy.

The table had 5 small jars (purchased from the Dollar Tree) filled with yellow and black candies.  Lemon drops, scooters, black raspberry chews, black m&ms and yellow m&ms.


I purchased small sized vanilla sandwich cookies (fake oreos) at the Dollar Tree and dipped them in yellow candy melts (available at craft stores in the cake decorating department). Then I zig-zagged black candy melts over them to make cute little bees.

The beehive cupcakes were made by making standard cupcakes in silicone cupcake liners. Once baked I removed from the liners and flipped them upside down. Then I piped lemon frosting from the base upwards and added a black M&M for the opening.


I found the small raffia beehive at Michaels Crafts on super clearance. It was covered with fake cactus plants. Once I removed them it was a perfect table decoration! Add some quart mason jars with yellow flowers and it made the table super cute.  The yellow B was purchased from Michaels clearance and was just 25 cents.  It was originally red but I painted it with craft paint to match the color scheme.


The small black and yellow buckets were purchased at Target Dollar Spot and filled with black licorice and Bit-O-Honeys....both of which were rejected. Can you blame them? 


This tray of "Bee Stingers" was made by dipping stick pretzels in the yellow candy-melts and then drizzling with black candy melts. The kids loved them. (I saw this idea online and CAN'T find the original link now!  Sorry!)


I also bought three small picture frames from The Dollar Tree and added pictures of the birthday girl as a baby and two favorite photos from her recently.  I painted one of the picture frames yellow.


I made a beehive pinata (originally seen here via Country Living) with paper mache and a balloon. Then covered it with yellow streamers. Left over black and yellow pipe-cleaners were twisted around a pencil and glued on as little bees. I love how this turned out.


Because the kids were so young we didn't blindfold them or move the pinata. It took the oldest guest (my seven year old, Ella) to finally break it. Inside were individually packaged teddy grahams (for a healthy option).

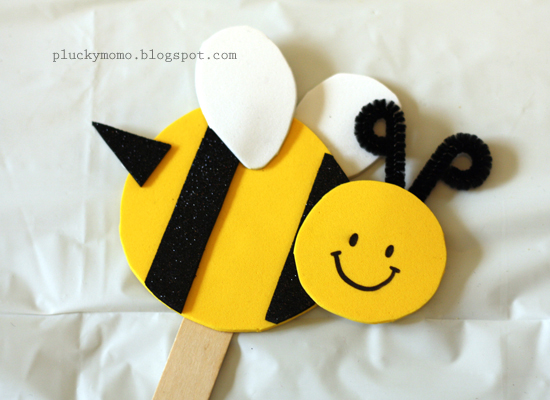
The guests colored a beehive coloring page and also did this bee craft, which I made up. All of the pieces were self sticking craft foam, so we only needed an adult to help glue on the pipe-cleaner antenna and glue them to the tongue-depressors. It was a hit!


This was my FAVORITE craft from the party. Before the party I designed this beehive printable and printed at at 8x10". I used a yellow stamp pad (purchased at A.C. Moore for $1) and had each guest place their forefinger on the pad and add it above the hive. Then we used a sharpie pen to add a black stripe, wings and other bee details and then added their name. I put the finished poster into a black 8x10" frame from Dollar Tree and hung it in my daughter's room as a keepsake from her birthday. So simple, inexpensive and cute!


Here's a close-up of the little fingerprint bees.


Guests got a gift bag with a small yellow party blower, a yellow bubbles bottle which I added a strip of black and white paper to and a small wooden bumble bee (which i bought at the craft store).


Their bags also had the treats from the pinata. I tied the bags with yellow bakers twine which I made using the tutorial found here.  I wrapped my string around an empty CD case instead of a ruler to make more at one time.

Just wondering...would a video on making the tissue pom-poms be helpful?  I couldn't find a good one when I started out making them.  Anyone interested?


baby shower invite

5.24.2012

I designed a Baby Shower invite for my sister-in-law today
since she is throwing a baby shower for her friend Megan soon.
The theme of the baby shower is Peonies and Pom-Poms.
Can you image how beautiful a room filled with pink and orange peonies 
and large white tissue pom-poms will be?  
Cutest baby shower. Ever.


"Movie" Party Invites

3.19.2012

Evangeline recently turned 5 and her chosen birthday party theme is "Movies". So, I had the idea to make a movie theater ticket invite and then I realized that movie theater tickets are kind of lame looking these days. I mean, it's just a white slip of paper with black print on it. So, I made a sort of raffle looking ticket. Maybe it doesn't relate? But, whatever.

I made these tickets in Photoshop and made them large. I wanted a really over-sized tickets.  These measure around 7 x 4".  You'll notice I used a slightly reddish/grey color so when it was printed onto the reddish/pink paper it would look authentic.  The font is BEBAS (love this font) and is available for free download here.
Then I simply printed (two per page) onto reddish/pink raffle ticket colored paper.  Next I cut around the edges, leaving a 1/4" border. I used a 1" circle punch to punch out along the notch I had created in my file.  Then I used a standard size hole punch on each corner.
I purchased Orville Redenbacher's Smart Pop Mini Bags. They are kind of healthy and are a single serving size. I tied a mini bag of popcorn to the ticket with a big red bow and Eva hand delivered these over the weekend. 
I'll be sure to fill in all of the party details. I have some pretty fun ideas brewing and I can't wait to see how it all turns out! Stay tuned!

"Sip Sip Hooray" Birthday Silly Straws with FREE Printables!

3.15.2012

It's little Eva's 5th birthday today! We were up early, showered, dressed and ready to take tons of fun things to pre-school today. We are in charge of the treat so I made these cupcakes. No biggie, just a white cake mix topped with strawberry frosting.

Pin It

Next up were the class favors. I found a package of 8 silly straws at Wal*Mart for $1.99 and then came home and designed these tags that slip right on! Super cute and super-inexpensive! And what 5 year old doesn't love a silly straw?!  I used my Silhouette Cameo and the Print+Cut feature to perfectly cut out each circle and the holes for the straw.  I love the Silhouette so much! It makes making custom party favors like this a breeze!

I thought I had better share a free printable with my wonderful readers! So here you go! I changed the tag so it doesn't say "Eva"...I mean, that may isolate some of you.
Pin It

 
*files are marked SHARE WITH ALL. Please do NOT request file.
 
 
*   *   *  *   *   *   *   *   *   *   *   *   *   *   *   *   *   *   *   *   *   *   *   *    
 
VALENTINE'S STRAWS
 I have added a new file to make these printable for Valentines.
 
 
 *files are marked SHARE WITH ALL. Please do NOT request file.