Showing posts with label Kids Clothing. Show all posts

Pattern Review: The Olivia Top / Dress

9.25.2013

I was asked recently to test a new top / dress pattern, THE OLIVIA TOP and DRESS, by Jess from Craftiness is Not Optional. I was really excited because everything Jess does is magic. Seriously.


Let me also pause and say I fiercely LOVE digital pdf patterns. I really hate buying store-bought patterns and only getting to cut out one size.  Then, it's over.  Also, I royally suck at re-folding that gauzy pattern paper and so I always think I will re-use the same pattern, but I don't.  But pdf patterns can be stored in my computer, take up no room, and can be printed and reprinted as many times as I want for as many sizes as I want.  Genius really.

Okay, now on to the pattern.


Once I got the pieces cut out (while watching an episode of Breaking Bad) it probably took me about 2 hours to make the dress AND I also added a lining since the bird fabric I used on the skirt was a bit too see-though.  So, even with an additional step it was still a quick sew.


I consider myself an intermediate+ sewist and I learned more than one MUCH BETTER way to do certain steps than I have ever known before.  Particularly a way of finishing the edges of bias tape that is pure genius.  Seriously, you have no idea how bad previous bias tape edges of mine have been on past projects.  Embarrassing.


The length of this dress was perfect. I find many dress patterns for little girls too short for my taste. Love that this hit perfectly at the bottom of the knee, but, of course, you can really shorten or lengthen it if you wanted to.


There were many different options that came with this one pattern.  Love that.


I did find the chest width of the finished garment to be big based on my measurements.  Next time I would make the 2T and adjust the length of the skirt.  But that is the case with any pattern, I find.  Sometimes it takes a bit of tweaking to your own child's particular body type.  Below is Jess' photo of her daughter wearing the dress and you'll notice it's wide under the arms.  That's about as wide as it turned out on Bianca as well.  I could pinch a good 1.5" on each side of extra fabric.  This can make it super comfy for little ones, I just prefer a more fitted fit.


I looove this pattern.  I will be making more dresses and tops from this cute pattern.

My Project Details:
Green fabric from JoAnn Fabrics
White bird fabric from IKEA
Black buttons from WalMart
Sewing Machine: Brother cs60001
Serger (Brother 1034D) used for finishing inside edges.


Click this link to buy



Pattern Review: The Skipper Top

8.12.2013


I was asked recently to test a new knit top pattern, THE SKIPPER TOP, by Abby from Sew Much Ado. I was really excited because...
1. Knits scare me
2. I hate the awful screen-printed tops out there for little girls.  I don't want my 6-year-old to be a 100% Drama Queen or a Little Diva. Sheesh!
3. I saw an awesome upcycyling opportunity with this easy pattern (more on that later in the post).

I downloaded the pdf of the pattern and let me start by telling you what was awesome about it BEFORE I even started sewing.

1. The pattern is professionally made and graded. I have bought hand drawn patterns from online sewists before and I love the straighter lines, smoother curves and easier read of professionally made patterns.
2. There is a size gauge square. Awesome. printers are tricky and sometimes printers print items whatever size they want. With this pattern there is no guessing.
3. The pattern tells you exactly which pages you need to print for the shirt options/size you chose. Love.
4. There are match-up arrows for each page so you know, for sure, you are taping the printed pages together properly. You have no idea how much my pregnant mind needed this!
5. There are instructions for serger and non-serger sewists! Bonus!

Okay, now to the pattern. There are TONS options. Different neckline, length, sleeve length and styles are all included. Awesome. The directions were clear and easy to understand and Abby gives you LOTS of hints to having a successful KNIT sewing experience. If you're scared, like I was, this pattern is a great place to start.


Here's what I sewed up for my kids...

For Ella (8 years old) I made this cute tee from a fabric she chose. It was some sort of poly/cotton blend so it was a great place to start since it's not WAY stretchy. I loved that the pattern pieces had included guides on which way to lay the fabric ("stretchiest side this direction") so I knew exactly how to cut.  After an evening of sewing I had this...


And the next day I had a VERY happy 8 year old.


Next came a try at UPCYCLING.  I had a shirt that I saved from before I lost weight that was a Womens 26/28 tee.

When I laid the pattern out I folded the shirt straight down the middle/front to cut the front pattern piece along the fold. Then did the same for the back.  With some easy sewing (it was much more quick after the first go) I had a great little 3T top for Bianca, my almost 3 year old.  Sorry, I don't have pics of her modeling it yet, but they're coming soon!
 
And I am now a full-fledged addict, people.  I went to Joann Fabrics today and scored four more knits from their clearance section to make into the Skipper Top.  I love how easy and customizable it is.  And the little pocket? Adorable!

Hop on over to SEW MUCH ADO and snag this pattern. You won't be sorry and you may just become and addict like me!


Happy Sewing!


Tutorial: Lace Lined Love Shirts

2.15.2012


  For Valentine's Day this year I made lacy shirts for my girls to wear to school. It was very easy (in fact I sewed them both on Valentine's Day morning before school) and inexpensive. My girls LOVED them!


- One pink shirt
- 2-3 yards lace trim
- Sewing machine with white thread
- Marking pen


1. Use your marking pencil to draw a heart on the shirt front. Make sure it's not too wide since the lace will flow outward from the line.
Note: You may also print and then trace a heart pattern from clip art.
2. Fold under end of lace edging and place it on bottom tip of heart.
3. Sew with the edge of the lace just covering the line you drew - with the lace pointing outwards.
4. When you come to the bottom tip of the heart, turn under your edge and sew to the starting point.


5. You can stop there and have an outlined heart OR continue following the heart shape towards the middle of the heart until your tail of lace meets in the middle and tuck under end to finish.

Hope you have fun making these ALL year round and not just in February!

4th of July Dresses

7.04.2011

I have never actually made 4th of July dresses before this year.  A few years back (2009) I made T-shirts for my girls (when there were just 2 girls).  And, of course the attempt to capture a decent photo of both girls looking at me was useless.  It went a little something like this...

Okay! Everyone look at me! (click) No! Look at ME! (click) Girls! (click) Say "Cheese!" (click) Say "Happy Birthday America!" (click) Show me the t-shirts! (click) No...look HERE! (click) Hold still! (click)(click)(click) ...Oh, forget it.

But months ago I saw this red, white and blue floral fabric and thought it would be perfect to make dresses.


Because there is always a lot of fun and activity on this holiday I wanted the girls to be comfortable so each of these dresses is made with a T-shirt top and a non-stretch, 100% cotton bottom.  I hadn't tried this method before and it was a snap!  I made all three dresses in about 2 hours.  Nice!


Each dress had a different ruffle element, which the girls loved.  Different, but matchy is big in this house.  The ruffles were made from the bottom portion of each t-shirt which was cut off after sewing it to the skirt.  Then I added a sash of red fabric covered in tiny white polka-dots. This is pretty much my favorite fabric ever....seriously I have about 10 yards of it.  It's a sickness.


Ella got a large ruffle around the neckline.  This was my Houdini move because the neckline of this shirt was all oddly flopsy and stretched out.  The ruffles covered it perfectly.


* * * * * * *
 

Evangeline got three rows of small ruffles.  Actually this one was a cheat because her t-shirt came this way, but had large chocolate stains on the bottom half...now covered by skirt.  Perfect!

 
* * * * * * *


 Bianca got one vertical ruffle.  Her skirt was sewn to an existing onesie.  I left the bottom half on hers so it can still be snapped between the legs.  I used the leftover material from Evangeline's shirt to make one ruffle straight down the front of Bianca's dress.
 

Hope you have a great 4th of July!


Tutorial: Prep School Skirt

5.17.2011


I'm a major thrifty crafter. So I live for a thrifty crafter's paradise...Goodwill. There I found a Men's lined blazer for $3, but it was marked down half price to $1.50. Holla! Add some ribbon for $2.50 and you have a tweed back to school skirt that is preppy and ultra-cool. And all for a grand total of $4.00!


 - mens lined blazer
- matching thread
- sharp sewing scissors
- hand sewing needle
- spool 1 inch wide washable ribbon in coordinating color
- iron
- 1/4" wide elastic
- measuring tape


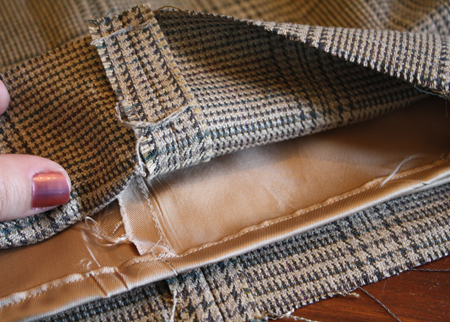
1. Carefully cut lining from coat.  Cut back panel of coat at seams.  Fold top to bottom the long way.  This is your main piece of fabric.


2. Use measuring tape to take two measurement.  (1) Your child's waist (right below belly-button) and (2) from their waist to the bottom of their knee.  You will use these measurements to make the pattern for the skirt. 


- Take your waist measurement. from all the way around.  Add 3.5" to that measurement for seams and a little room. 
- Divide that measurement in half since we are making a front panel and a back panel.  That becomes your top measurement.
- Add 3 inches to that measurement to create an A-line effect. This becomes your bottom measurement.


3. Cut pattern pieces from tweed and then follow the same steps to cut pieces from silky coat lining.

4. Sew 5/8" seams down each side of tweed and repeat step with silky lining.


5. Turn your skirt right side out, but keep the lining inside out.  Place lining in skirt and line up along top edge.

6. Change your machine settings to a very long straight stitch for basting.


7. Stitch along the top edge of skirt with a 1/4" seam.  This will hold the skirt and lining together while you hem the skirt.


8. Next you'll work on the bottom hem.  


9. Hem the silky lining of the skirt by ironing it 1/4 inch up and then folding it 1/4 inch above the ironed edge. Stitch to create hem.


10. Take your 1 inch ribbon.  Fold it over and iron to keep closed.  This will become a make-shift bias tape.  Sew along bottom hem of skirt. (you may want to tuck lining far towards the top of the skirt so it doesn't get caught in the sewing).  Repeat this step along top seam of skirt at waistline.


11. Use your iron to create pleats in your ribbon (at full width).  Create an even number of pleats because we will be adding one more when we finish the ribbon detail and you want to end up with an odd number. 


12. Pin your pleated ribbon to the bottom right edge of your skirt, starting 3 inches from your skirt's side seam.  Measure 1 inch up from the bottom bias tape edge all the way around and pin in place.


13. When you reach all the way around, cut your ribbon so that there is 2 inches beyond where the unfinished ribbon edges should meet.  Then create a pleat by folding the unfinished edge under, slightly overlapping the first pleat's raw edge.


14. Pin in place, covering both raw edges.  Sew around top edge of ribbon. Repeat along bottom edge of ribbon.


15. Finish top of skirt by folding down skirt top (it was edged with folded over ribbon) 1 inch and sewing along edge, leaving 1 inch open. Run 1/4 inch elastic through. Close opening.

16. Remove buttons from jacket front. Use needle and thread to hand sew three buttons along front right bottom edge of skirt.


This was so easy to make.  I ran back to Goodwill and snagged two more men's coats for even more Prep School Skirts.  Now I'm off to buy some white knee socks and some brown leather mary-janes to complete the look!

WHO WOULD YOU MAKE A PREP SCHOOL SKIRT FOR?