disney's tangled birthday party

2.27.2011

yesterday was our daughter, ella's, sixth birthday party. they have a rule at ella's elementary school that if you invite one student from the class you must invite them all. this led to a crazy party of around 20 six year olds.


it was themed around the disney animated feature film TANGLED. here is what we did for the party.


{ the invites }

we had both boys and girls attending our party and i didn't want the invites to be too feminine.  i started out with a wanted poster from the movie, which i blanked out using photoshop and then added my own text.  download a free blank copy to add your text to by clicking here.

other ideas:
- free printable invites on disneyfamily.com
- make these adorable ones from supermommoments.com


{ the decorations }

i used the free printable banner found here via supermommoments.com.  i used cotton twine to string these along the front of the party table and across our mantle.  it was so cute!  i purchased lanterns from Dollar Tree in different colors and strung them above the party table. 

other ideas: 
- mix store bought lanterns with handmade lanterns that are exactly like the ones from the movie using the free templates and video tutorial found here.
- use long strands of yellow thread tied at the end with purple ribbon to create Rapunzel's hair and drape around party as seen hereso cute!


{ the activities } 
we started with free printable coloring pages from the film, making sure i had plenty of the flynn rider pages for the boys.  then we headed down to the basement where we had two activities. 

1. pin the frying pan on flynn rider.  we used the printable frying pans from here.  i had each child write their name on their frying pan first so we could assess a winner, who got a small prize.  then i took this image to a copy center and paid under $3 for them to blow it up to poster size....no drawing skills required.  the child who got flynn right on the nose won!


2. make a foam pascal  grab the free template to trace pascal's head from the disney website.

( image via disneyfamily.com )

i was able to find 8 packs of pink blowers in the party section of our local Dollar Tree.  I purchased foam sheets which already have sticker backing so i could avoid a glue catastrophe with the kids (purchased at Michael's).  i cut 1 inch circles and grouped them in pairs for eyes (i didn't bother with the yellow).  the kids used black markers to add pupils and then added them to the foam head pieces.  they used the same marker to draw the moth on pascal.  then they just peeled and stuck onto the blower and voila!  a big hit!

( a party guest with her finished pascal blower )

other ideas:
- set up artist easels and lay down floor covering and let kids paint a masterpiece.
- tug of war with a yellow rope tied with purple bows on each end (best for outdoor parties)


{ the food }

we had our party at 1:00pm as to not have to serve food.  all we had was the main cake and cupcakes.  the cake idea is by Bakerella and can be found (with full instructions) here on the disney website here.  may i mention that i am an accomplished baker and i wish i had not taken it on.  buying craft foam, wooden dowels, pecan rolls, leaf tips, yadda, yadda, yadda was just not worth it to me.  the finished cake is not very tall (12 inches) and I could not find brown cupcake liners for anything in my area.  for me it became too much hassle...not enough pay off.


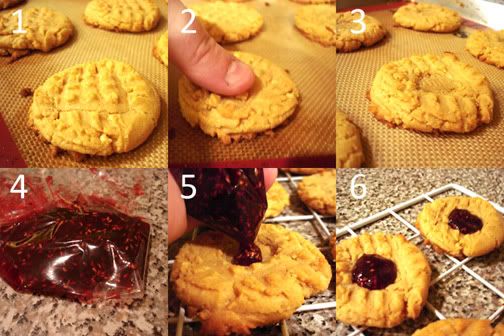
the cupcakes were easy and beautiful. i borrowed this idea to use green frosting and add fake flowers on top.  it looks amazing and the kids licked the frosting off their flower buds and kept them as a favor (not my intention, but hey! whatever makes them happy!)


i snagged these super cool new cupcake liners at the local A.C. Moore made by Wilton.  I like the additional floral element it added. caution: any little drip of cupcake batter that touches the raised edges will turn a hideous brown and look awful. i used a 1/4 cup measure to make measuring and pouring easy, but still lost a few due to splattered batter.

other ideas:
- find loads of amazing ideas for a full dinner or snacks here.


{ the favors }

i made these small paint kits.  i got the idea from another blogger who used full water color paint sets for each guest, but i was not prepared to spend $20 on favors....so i made a scaled down version.  This pack of 18 paints was $2.24 at Wal*Mart and I got six favors out of each package.  then i grabbed a $1 pack of colorful paint brushes.  total cost was about $0.50 per child.


i hope you got some good ideas!
next stop: Despicable Me party in two weeks for Evangeline.

pampering party report

2.25.2011

the pampering party i was a vendor at was last night and i had such a great time! here is what my table looked like...(sorry about the yellowish lighting)


i made the bunting out of paper pendants and sewed them together with one long straight stitch. i had mustard yellow and light blue elements everywhere on the table...from the dish which held my business cards to the blue canning jar propping up the frames.


i had to supply each guest with a freebie so i gave out these luggage tags...they were a HUGE hit!


the girls modeled different types of hair flowers for me this past week and i made a collage and put a framed copy on the table to give the locals some visuals of just how cute my hair blossoms can be. 


each blossom was displayed on these cards i designed in photoshop.  here's what they looked like...


it was a really good night and starting this sunday, all left over inventory
will be in my etsy shop and ready to ship to you!

life among the amish means....

2.24.2011

slowing down for buggies.
learning not to take photos no matter how cute the amish kids on the tire swing are.
and tons of little shops displaying amazing, handmade quilts like this one....


i spotted it in a small quilt shop in bird-in-hand, pa.
it was hanging on a rack, so i asked the nice amish woman if i could take it down and take a picture.
she happily obliged and we chatted for a while as i snapped away
and dreamed of having $700 to purchase this exact quilt. 

a few tidbits of info about traditional amish quilts...
- they are sewn on sewing machines. sometimes pedal and sometimes electric.
- they are made only using pieces of fabric leftover from the clothing the family makes.
- if pink is in the quilt you know the family has a little girls, since adult amish women do not wear pink.
- there is no yellow or orange in amish quilts...those colors are considered vain.
side note: a life without orange? i cringe!
- although the quilt top is pieced on a machine, the actual quilting of the layers together (using intricate patterns) is done entirely by hand.  yep, every little stitch...hence the $700 price tag.


 isn't it divine?

i would love to know if there is a history of quilting in YOUR area of the country/world?

this week...

2.21.2011

i am busily making about a gazillion of these in various sizes and colors.
some attached to pin backs.
some attached to headbands.
some clustered together on barrettes.

this one is a generous 4.5" across.
wouldn't you just love to pin that onto the lapel of your cutest jacket?

heading to a craft fair this thursday with these in tow.
left over inventory will hit my etsy shop this friday!

Art Canvas Follow Up

2.19.2011

Remember this post about getting canvases printed from artscow.com?
Well, I received mine in the mail this week.

I wasn't sure what to expect as this company is in China
and I distinctly remember when I worked for a scrapbooking manufacturer
their samples coming back from China in completely fluorescent colors and botched shades.

But my canvases are perfection!
Even better than I had hoped.
Check them out...
Love.

Question....

2.16.2011

I have a family blog
And on that blog I share recipes.


Would you like recipes shared here?
Or are recipes not entirely crafty?
What if the recipes had a 4x6" printable recipe card download?
Like the ones shown here.

Just wondering.

{love}

2.14.2011

she headed off to school today with a heart covered box
filled with 16 of these handmade valentines
(idea inspired full-on stolen from here).


and the close up....


and 2 of these (there's a tube of pomegranate lotion beneath).
one for the kindergarten teacher and one for her aide.
(idea found here).


tonight we will have a fun family night with small gifts for the kids and thursday
(yes, it was the first day we had free) the Hubbs and I
will go out to dinner somewhere romantic....like denny's.

hope your day is filled with LOVE of every description!

Book Review: How to Sew a Button

2.10.2011

How to Sew a Button: And Other Nifty Things Your Grandmother Knew
by Erin Bried
★ ★ ☆ ☆ ☆

I expected to like this book much more than I did. I really agree on the overall premise. I think we could learn a lot and utilize our resources much better if we took a cue from the older generations. I know many women who can't sew a button.

One of the issues is with the writing style which is forcefully cheeky. Sometimes you find this forced humor funny and other times, annoying. Also, the book is peppered with illustrations of various retro women engaging in the tasks being explained, but what it really could have used are a few illustrations to clarify the more complicated instructions.

There is some very useful information in this book, but not any you wouldn't find through a google search in a much more clear and concise manner with pictures included.

Have YOU read this book?
If so, what did you think?

Featured Book on Shutterfly!

2.09.2011

I got an email today from Shutterfly telling me that my ENCYCLOPEDIA OF ME digital Photobook (see it page by page here and then read my follow-up here) is their featured book!  Woot! 

The lovely email read...

My name is Savannah and I'm the head of Shutterfly's Scrapbooking Advisory Team. I help manage Shutterfly's Gallery and I wanted to let you know that we're featuring your "Encyclopedia of Me" photo book in the "Digital Scrapbooking" section of the Gallery.  It's such a great idea for a book. I've seen lots of ABC books, but it never occurred to me to use the same style for an adult book. It works perfectly! Great job.


Check it out here within the next three days...then they rotate for a new pick.
If you miss it, here's the screen shot (click to enlarge).


Disney's TANGLED Party Invites

2.08.2011


In case you don't have small children, this is a wanted poster of Flynn Rider from the Disney movie TANGLED.  Ella is having a Tangled birthday party this year, but we are inviting boys as well as girls, so we didn't want the invite to be overly femmy. 

I swapped out some of the poster's real words and added our own for a custom invite.  We know all the kids from Ella's class at school have seen this film since last month a classmate had a birthday party where the entire theater was rented just for them to watch this movie.  A very hard act to follow.

But I'm cooking up some sa-weet birthday party fun!  More details to come.

Tutorial: Photoshop Actions

2.07.2011

A few years back I had a bunch of people ask what camera I use to take my photos. Back then I was shooting with a normal...everyday...little Sony digital DSC-W5. Fits in my purse. No lenses to lug around. And the best part? Set on auto mode with the flash turned off. No aperture and ISO for me...I didn't really know what those things were back then. So how did I get such good photos? The answer.....Photoshop Actions.


So just what are "actions"? Say a fancy-shmancy professional photographer takes some photos and loads them onto her computer to enhance (or "proof") them. She might sharpen the image. Adjust the lighting. Enhance certain colors...all to get a certain effect. As she proofs her photos, our imaginary photographer records and saves every step that she takes. She can then save all of these steps and turn them into an "action".

So, an action is a set of photo altering steps used to achieve a certain look. Get it? So instead of a amateur like me actually learning about how to use every single little tool in Photoshop to make a photo black and white and enhance the contrast...I can just buy some genius' Photoshop Actions and they do it for me.

You plunk any photo into Photoshop and hit a play button and the steps do ALL of the work for you. And there are infinite numbers of actions to try...from making your photos into comic book characters, making them look warn and vintage, sharpening, rounding corners...and much much more.


(click to enlarge. Courtesy of Mindy's Photo Actions)

You can always use Google to search for free actions to try out. A good resource for free actions is Action Central and the Adobe Photoshop Exchange. The Pioneer Woman offers a free set on her blog that I LOVE.

You can also buy some if you can't find free ones you like or find a certain photographer whose proofing you really love. Before you purchase any Action sets make sure they are compatible with your particular program. Some are only for Photoshop Elements and others only run in regular Photoshop.

A popular site is Itty Bitty Actions. Their sets run for around $100 and you get a large number of actions (around 50). But my favorite set is perfect, inexpensive and worth every penny. Mindy's Photo Actions Vibrant Color set. I bought them at http://mindysphotoactions.blogspot.com/. Mindy herself will help you install them and answer any questions you may have. This makes them perfect for a beginner who is unsure about installation and utilizing them. She sells them for cheaper in small sets so you can just buy what you want and add more later as desired. I use her "Vibrant Color" on pretty much every photo I take and often use her "Soft Indoor Light" as well. Here's a little before and after so you can get the feeling of what these actions can do for you.

BEFORE:

AFTER:

I'm not being overly dramatic when I say that Actions have changed my life. They have enhanced my photographs so much that I felt proud enough of family photos recently to frame them and hang them in my Living Room. I just can't live without my (I mean Mindy's) Actions and my freebie Pioneer Woman set.

What do YOU think? . Have you ever tried Photoshop Actions? Would you like to try them? Do you think they are worth the money or do you prefer more traditional photos? Do you have a favorite set you want to share?

P.S. Stay tuned for a coming lesson on installing and using actions in Photoshop and Photoshop Elements.

Book Review: The Handmade Marketplace

2.03.2011

by Kari Chapin
★ ★★ ★★

I have been in the online crafting community for a few years now (formerly in the Scrapbooking industry) and how I wish this book was out there sooner! First, it is packed (and I mean PACKED) with every tidbit of information you might need about selling handmade goods. It is a very easy and entertaining read, which is hard to do when you are presenting so much information.

Despite already having a pretty good knowledge of selling my goods online and otherwise, I still learned A LOT of helpful information from this read. The format was very flowing and the tidbits of practical info from various celeb crafters was very insightful.

I highly recommend this book to all who are considering (or who already are) selling their handmade goods. This will prove to be an invaluable resource!  And don't just get it from the Library because you're going to want to highlight it...I promise.

Have you read this book?
What did you think?

Prognosis Pictogram

2.01.2011


Be back soon! (cough! cough!)

FREEBIE: Printable Valentine's Art


As a little gift from me to you this Valentine's Day here's a FREEBIE printable Valentines sign for your home.
Simply click HERE to download, then print on your home printer or at a local photo lab and frame. 
Print is sized 8x10".

Here's how it will look printed and framed.