


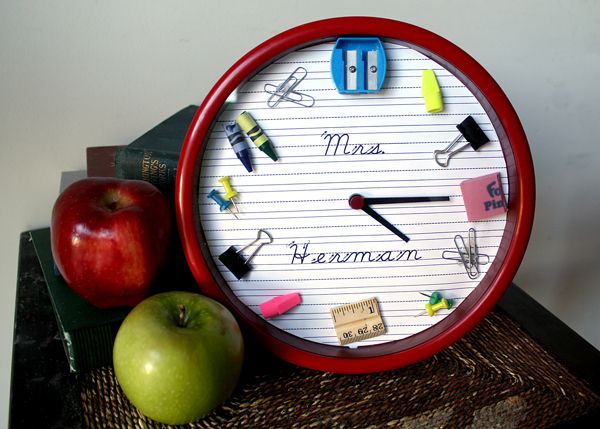

With my oldest daughter, Ella, beginning Kindergarten this year I have now entered the world of Teacher Gifts. I went in search of a cute, practical and personalized Teacher Gift for the bestest Kindergarten teacher in PA, Mrs. Herman. And this is what I came up with.
Finish this cute, personalized clock in under an hour. And for around $10 and it will be sure to be a standout among the gift cards and pencil boxes that teachers always receive!

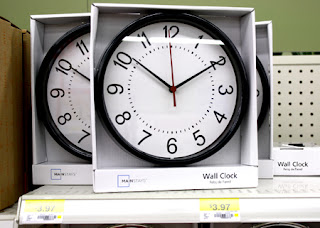
- 1 small clock (these cost under $4 at Wal*Mart....bargain!)
- hot glue gun
- various small school supplies (check out Dollar stores for great deals!)
- downloaded "Life Lessons" font from this website.
- Microsoft Word or Adobe Photoshop
- white 8.5x11" cardstock
- home computer printer
- glue stick
- scissors
- ruler
- bowl or other round object with an 8" diameter
- pencil
- wire cutters
- very small phillips head screwdriver

2. Print clock face onto cardstock using the following instructions...
Adobe Photoshop
1. Create a new 8.5x11" canvas.Microsoft Word
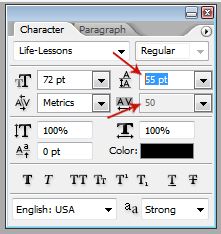
2. Start a new text layer. Choose LIFE LESSONS from your font options.
3. Click on this small icon along the top toolbar.
4. This box will appear. Highlight the top box and type 55 in. Highlight the lower box and type 50 in.
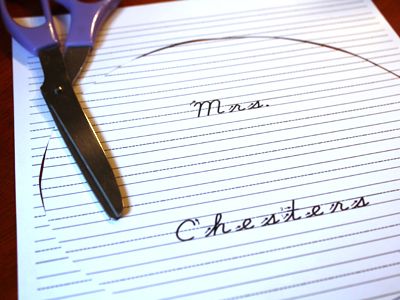
5. Leave a 1 inch border along the top and bottom of your page. Starting at the top of your page type spaces using the space bar all along the width. This will make the practice lines appear. Make sure to not leave a margin...type all the way to the edges of the page.
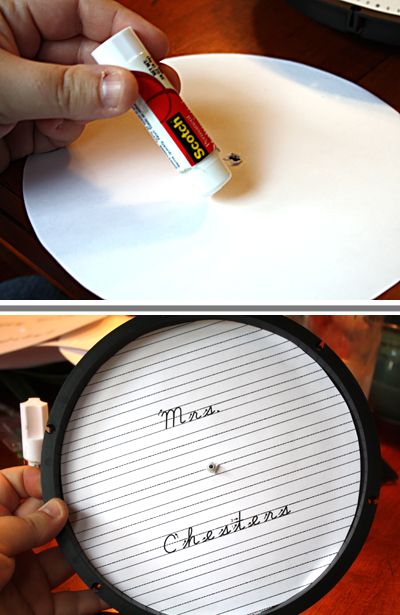
6. On the fourth line type MR., MRS. or MISS. Put spaces on either side of the word until it is centered. Then space bar three more blank lines. On the eight line down type the teacher's last name. Put spaces on either side of the word until it is centered.
7. Type three more blank lines and Print onto 8.5x11" cardstock. Even if your program sends an error message saying some of your text is outside of the printing area, just click okay and continue to print.

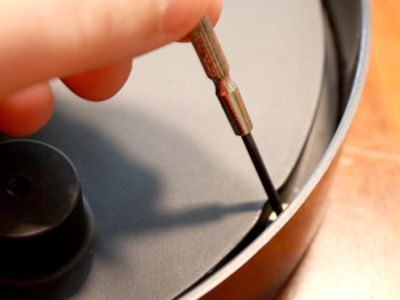
1. Create a new 8.5x11" document.2. Turn clock over and use small screwdriver to remove the 6 small screws. Place these screws in a small dish. Remove black outer ring and glass. Set aside.
2. Click PAGE LAYOUT > MARGINS > and make top and bottom margins 1" and left and right margins .5")
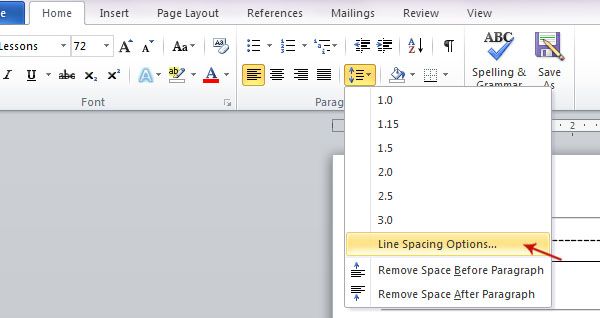
3. Choose LIFE LESSONS from your font options and center your text.
4. Click LINE & PARAGRAPH SPACING icon > LINE SPACING OPTIONS.
5. Under LINE SPACING choose EXACTLY and under AT change it to 55 pt.
6. Starting at the top of your page type spaces using the space bar all along the width. This will make the practice lines appear. Make sure to not leave a margin...type all the way to the edges of the page.
7. On the fourth line type MR., MRS. or MISS. Put spaces on either side of the word until it is centered. Then space bar three more blank lines. On the eight line down type the teacher's last name. Put spaces on either side of the word until it is centered.
8. Type three more blank lines and Print onto 8.5x11" cardstock. Even if your program sends an error message saying some of your text is outside of the printing area, just click okay and continue to print.


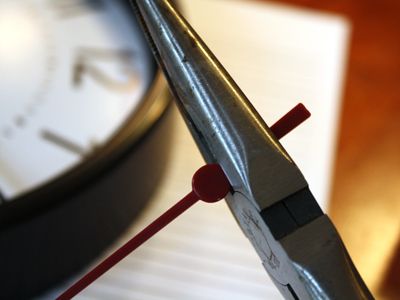
3. Gently pull up to remove hands of the clock. With wire cutters, trim the different clock hands to the following measurements...Hour hand to 1.5" long, Minute hand to 2.5" long and remove both sides of Seconds hand to leave just a small red circle. Place trimmed hands in same bowl as small screws. Set aside.

4. Trace 8" circle onto printed cardstock sheet. You can do this by using a circle cutter, finding a bowl which is 8" across or by tracing around the glass included with the clock and then trimming it 1/4" inside the trace lines.
5. Place paper on top of clock face, making sure it is centered and gently press down on the mechanism which holds the clock hands, making an indentation. Then use scissors to cut a hole large enough to go around hands mechanism.
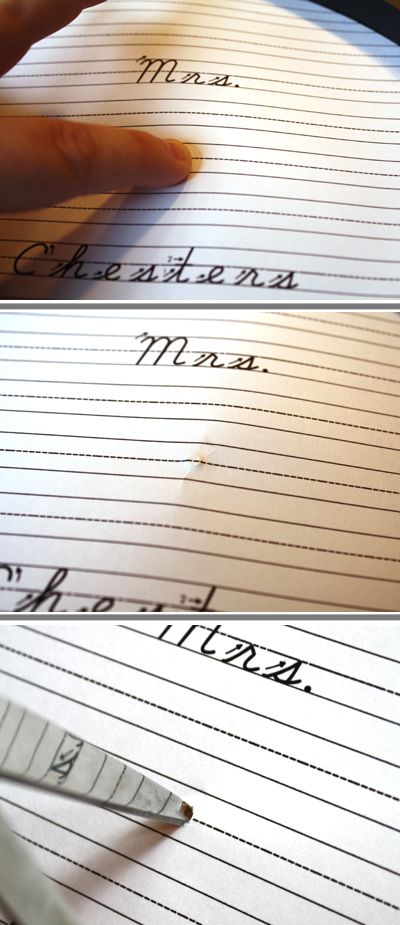
6. Place in clock face to make sure you have the correct fit. Then, turn over and use gluestick to cover back of cardstock. Press onto clock face, making sure to keep "12" at the top of the clock. (you'll notice that there is a round nail hole where you took the screws out of at the top of the clock to help you orient it correctly).
7.Starting at noon, place your small school supplies around the clock face until they are organized the way you want them. Make sure to vary colors and material (put plastic next to metal clips and pink eraser next to blue push pins, etc).
8. Remove your items and lay them next to your clock in the order they were on your clock face. Now, use a hot glue gun to glue down your school supplies, gluing down in this order...12, 6, 3 and 9. Then fill in the gaps in between those points. When using groups of items, like paperclips, I simply laid down a blob of glue and quickly arranged a pile of the items on top.

9. Now replace the hands of the clock, putting the red dot on top. Don't worry about not putting them on in the correct order, they should only fit on in the correct order.

10. Clean glass and then handle carefully to replace glass and screws.
You're finished! Wrap up and gift to your child's teacher (it would be nice to include the AA battery required).
Note: I used a red rimmed clock and then regretted it because it clashed with some of the red school supplies I found. I would recommend using either the black or white rimmed clock.


23 comments:
You are aMAZING!!! This is adorable, and I LOVE the red clock!!!
this is extremely cute! Very creative!
taidye original
So cute. And man, how funny is the example on the font download site? "cursive is for sissies." made me laugh out loud.
I have been teaching for 20 years and SO wish your child was in my class! :-) I'm making one for myself anyway...and maybe a few for my teacher-type buddies. Thanks for the fabulous, creative ideas. (You never let me down.)
This is super cute. I think I'll try to match up the objects with a corresponding number. The pencil sharpener kind of looks like an "11" to me and the I might cut the ruler at the 12" mark and then find other things for the other numbers or use the two crayons for the number 2, three paper clips for 3, etc. Great idea!
that is absolutely adorable!!! i love it! so clever.... i'll be adding this to my favorites folder for future use!!
jen
Awesome. I'm always looking for new and cool teacher gifts. Directions too, what a bonus, thanks.
hiya , this is soo amazing , and yuor tutorial is great too , thanks for sharing and i hope this project makes it thriugh to the next stage of the omtwi
xmaggiex
Feature alert! Feature alert! I featured this over at Today's Top 20!
Amanda
www.todaystoptwenty.blogspot.com
This is adorable! What a great teacher's gift! Thanks for auditioning for OMTWI!!
i googled teacher gift tutorials hoping for something different. This is so cool. I can't wait to try it. Thank you. Look forward to checking out the rest of your blog.
Thanks so much for this amazing & awesome idea! I bookmarked it months ago & planned on making it for the end of the school year! I just finished making one for my dd's teacher since school is almost over & it turned out fabulous! I bought a red one since he is a fan of red only to read your last comment about the red clashing! The items I put in the clock, however, are a bit more more masculine so luckily they didn't clash with the red. It looks great & I know he's going to love it. Thank you so much for your detailed instructions.
This is definitely a top favorite of mine! You are such a smart mama!
I included a link to it in my top 23 Fav Teacher Gift Tutorials round-up! Feel free to grab a featured button.
Won't the Push pins be pointy, and pointy + little kids = trouble...
Well, you can decide if your child is old enough to attach the pushpins. Sorry, but isn't that a given? Do I really need to put a disclaimer on each project?
I have been searching for an hour for the perfect gift for my daughter's teacher but nothing has really jumped out at me...intil this! I love love love it and will definitely be making it. Thanks for the idea and the instructions! You are amazing!!
so wonderful !!!!! I JUST MADE IT !!! I put article tomorrow ! I'll have to take photos !
many many thanks !
sincerely Emilie
so wonderful !!!!! I JUST MADE IT !!! I put article tomorrow ! I'll have to take photos !
many many thanks !
sincerely Emilie
I was searching an idea for my daugther do a gift for her school teacher and I found your blog !
I love your idea and we spend a wonderful moment doing our own version !
Thanks !
beautiful !! worth for childrens..
i will try to do same for my moms bithday...with pic.
Hello, I'm trying to do this project. I am having trouble getting all the lines to print. Not sure what I am doing wrong, I've followed all your steps. The lines appear when I do a print preview but not when actually printed.
The article has a beneficiary content, Thank you for sharing. Read our blog for : printed wall clocks
I love the red clock. Makes me think of the little red schoolhouse!
Post a Comment